PHP Console Log for Backend Debugging
What is bcons?
Bcons is a service that allows you to send data from your PHP code to a custom console.
It allows you to perform debugging tasks, such as logging messages or the values of variables at set points in your code, displaying errors and warnings, and tracking session, cookies, and payload data.
It’s a port of the browser Console API to PHP. If you’ve ever done JS development in the browser, you will know about console.log: bcons brings that same idea to PHP as a simple PHP console log for your backend code.
Main components
The bcons service comprises three main components:
A browser extension that adds an HTTP header to requests made to any domain assigned to any of your projects.
A PHP class that allows you to send messages to the console from inside your backend code.
A console where the messages are beautifully displayed.
What's the bcons console?
The bcons console is where all messages are displayed. You can access it in two ways:
- Via developer tools: the bcons browser extension adds a panel to the developer tools window with the bcons console.
- Through the bcons.dev website: the bcons console is also available on bcons.dev in the Console section.
Messages are also displayed in the browser developer tools console (although this can be turned off if you don’t want to mix backend and frontend debug messages).
Below, you can see a sample instance of a bcons console. It’s live, so you can click around and try all the features.
How does it work?
Here’s a detailed walkthrough of the process:
1. When your browser requests a page from a domain assigned to one of your projects, it adds a custom Bcons-User HTTP header to the request. This header contains your user token.
2. The Bcons PHP class detects this header, and when you call any of its methods, it sends a message to the Bcons server using your user token and the project token.
3. The message is then forwarded to your bcons console, where it is displayed.
Is it secure?
It’s totally secure!
Your user token is only sent to domains that you have explicitly assigned to your projects.
Messages can be disabled via the PHP constructor if you want to disable debugging in production environments.
All messages are encrypted end-to-end using AES-256-CBC.
The browser extension, the PHP class, and the console are open source, so you can audit them to verify that we’re not messing with your data.
Getting started
Follow these steps to start using bcons:
Create bcons account
In order to use bcons, you need a unique user token, which is assigned to you when signing up at bcons.dev.
bcons has a basic free-forever plan so you can use the service for as long as you want.
Sign in and head to the Account section; you will find your user token under the Authentication tab. Copy this value as we will need to provide it to the browser extension later.
Create a project
Projects allow you to use bcons on different codebases. Go to the Projects section of the bcons.dev site and click on the New project button to create your first project.
Enter a name for the project, and in the Domains field, enter localhost. This is the domain we will be using in this guide, but once you have everything set up, you can change it to the domain you are using to develop your project.
The project scope allows you to restrict project access to only some users of your company. Since you are on the free plan and you are the only user of your company, this doesn’t make any real difference, so you can leave the default option checked.
Once the project is created, you will see it listed with its token. Copy this token as we will need to provide it to the PHP class later.
Install the browser extension
The next step is installing the browser extension. bcons has extensions for the most common cross-platform browsers:
Chromium-based browsers
For browsers based on the Chromium engine (Google Chrome, Microsoft Edge, Opera, Vivaldi, Brave, etc).
Download from Chrome Web Store
Once you have the extension installed, click on its icon on the extension toolbar and select Options. Enter your user token in the input field, and you should see a list of your projects.
Firefox
Download from Firefox Browser Add-ons website
Once you have the extension installed, click on its icon on the extension toolbar and enter your user token in the input field. You should then see a list of your projects.
By default, the extension won’t be allowed to work on all sites. To enable it, go to the ‘Add-ons and themes’ menu section, click on the bcons extension, then on the ‘Permissions’ tab, and check the ‘Access your data for all websites’ option.
Include the PHP class in your code
The last step is adding the bcons PHP class to your code.
Quick test
For a quick setup test, create a folder on your disk. Download the PHP class from GitHub and save it as Bcons.php into that folder.
Create a file named index.php in that folder with the following content:
<?php
include(“Bcons.php”);
use Karontek\Bcons\Bcons;
$console = new Bcons(“your project token”);
$console->log(“Hello world!”);
$a = $b / 2;
echo “Open DevTools, click on the bcons tab and reload this page.”;
You can set the encryption key that will be used to encrypt the debug messages by passing an array to the constructor. This is highly recommended.
Otherwise, your user token will be used as the encryption key.
$console = new Bcons([
“projectToken” => “your project token”,
“cryptKey” => “your encryption key”
]);
Open a terminal in that folder and launch the PHP standalone server with the following command:
php -S localhost:8000
Now open a browser tab and navigate enter this URL:
http://localhost:8000
When the page is loaded, open the developer tools, and click on the bcons panel. Once you can see the bcons console, reload the tab.
You should see messages appear in the Log and Warnings tabs. All bcons messages are encrypted, so click on the lock icon of any of them to open the passphrase dialog.
If you set a custom encryption key in the constructor, enter that key. Otherwise, enter your user token.
Voila! You should now see the Hello world! message in the Log tab of the bcons console and an Undefined variable warning in the Warnings tab.
Using Composer
Download from Firefox Browser Add-ons website
Once you have the extension installed, click on its icon on the extension toolbar and enter your user token in the input field. You should then see a list of your projects.
By default, the extension won’t be allowed to work on all sites. To enable it, go to the ‘Add-ons and themes’ menu section, click on the bcons extension, then on the ‘Permissions’ tab, and check the ‘Access your data for all websites’ option.
Constructor options
The simplest way to create the bcons instance is by calling the constructor with a single string parameter, the project token:
$console = new Bcons(“project token”);
But you can provide many other options using an associative array as the constructor parameter.
$console = new Bcons([
“projectToken” => “project token”,
“cryptKey” => “a long and random string”
]);
These are the available keys for that array:
cryptKey
string (null)
A passphrase that will be used to encrypt the message data using AES-256-CBC. You will need to enter this same passphrase on the bcons console to view the message.
By default, your user token will be used as the passphrase if you don’t provide one. We strongly recommend that you change it to a long and random string.
Below you can see how the bcons console shows encrypted messages. Use the passphrase the cake is a lie to decrypt the message.
disabled
bool (false)
If true, no messages will be sent from the class. This allows you to turn off debugging while maintaining all debug function calls in your code.
errorReportLevels
array (E_ALL)
In addition to your own debug messages, bcons also displays PHP errors, warnings, and notices. You can use this field to set the specific levels of the PHP messages that will be displayed on the bcons console.
projectToken
string (Required field)
When passing an array to the constructor, you must always include the project token in this key.
sendCookiesDataOnStart
bool (true)
If true, any cookies data available in the $_COOKIES superglobal will be displayed on the Cookies tab of the bcons console.
sendRequestDataOnStart
bool (true)
If true, the payload sent with the request will be displayed on the Request tab of the bcons console.
sendSessionDataOnStart
bool (true)
If true, any session data available in the $_SESSION superglobal will be displayed on the Session tab of the bcons console.
If you are using any session mechanism other than PHP built-in sessions, you can send its data to the console using the sendSessionData method.
userToken
string (null)
The token of the user who is making the request. Any messages emitted during the request will be sent to the bcons console(s) of that user.
Usually, you won’t have to set this field because the bcons PHP class reads the user token from the Bcons-User HTTP header, which is set by the browser extension.
Also, setting a fixed value for this field means that all messages will be sent to that user, even if the request is made by another developer.
The only scenario where you would want to set a fixed user token is for code that is not executed in response to an HTTP request that may include the Bcons-User header, for example, a cron job or a webhook called by an external system.
userTokenHttpHeader
string ('HTTP_BCONS_USER')
The HTTP header where the class will look for the user token, as it appears in the $_SERVER superglobal variable. The default header name Bcons-User is stored in the HTTP_BCONS_USER key of the $_SERVER superglobal.
Usually, you won’t need to set this field unless PHP changes the way it translates custom HTTP headers to keys in the $_SERVER superglobal.
API reference
bcons implements all methods defined in the Console API spec and a few other of our own.
If you think of a new method that could be useful, please feel free to write to us and request it!
assert($condition, ...$args)
Writes an error message to the console if the condition is false. If the assertion is true, nothing happens.
Any extra arguments will be added to the message.
$console->assert(
1 == 2,
“1 is not equal to 2.”
);
clear($showMessage = true)
Clears all the console panels. To mimick the developer tools console, a Console cleared message is shown in the Log panel. To avoid this you can pass a false argument or use the clr() method.
$console->clear();
clog($className, ...$args)
This method works like log() but accepts a CSS class name as the first argument. This class name will be assigned to the HTML element of the message in the bcons console and will change the message color.
The bcons console recognized 22 class names with the names red, orange, amber, yellow, lime, green, emerald, teal, cyan, sky, blue, indigo, violet, purple, fuchsia, pink, rose, stone, neutral, zinc, gray and slate. See Tailwindcolor.com for a visual reference.
You may also use numbers 1 to 22 instead of the color names.
$console->clog(“pink”, “A pink message”);
$console->clog(5, “Number 5 equals to <em>lime</em>”);
clr()
$console->clr();
count($label = 'default')
Logs the number of times it has been called with the provided label.
$console->count(“foo”);
sleep(1);
$console->count(“foo”);
countReset($label = 'default')
$console->count(“foo”);
$console->count(“foo”);
$console->countReset(“foo”)->log(“Foo reset”);
$console->count(“foo”);
debug(...$args)
Alias of log().
dir(...$args)
Alias of log().
dirxml(...$args)
Alias of log().
error(...$args)
Works exactly like log(), but the messages are displayed in the Errors panel.
$console->error(“User generated message”);
$a = 2 / 0;
group($label, $className)
Creates a new group in the bcons console, causing any subsequent messages to be displayed inside that group, until groupEnd() is called.
Our implementation of this method includes a second parameter that allows you to choose the display color of the group. See clog() for details.
When a group is active, it will show all messages, including those that would normally be displayed on another panel like Errors or Warnings. Error messages will be displayed in red, and warning messages in yellow.
$user = [
“name” => “John”,
“email” => “[email protected]”
];
$console->group(“User data”)
->log($user)
->warn(“Email seems phony”)
->groupEnd();
groupCollapsed($label, $className)
Works like group() but the group is created collapsed.
$user = [
“name” => “John”,
“email” => “[email protected]”
];
$console->groupCollapsed(“User data”)
->log($user)
->warn(“Email seems phony”)
->groupEnd();
groupEnd()
Exits the last group created by group().
$console->group(“Block 1”)
->log(“This will appear on Block 1”)
->group(“Block 2”, “sky”)
->log(“This will appear on Block 2”)
->groupEnd()
->groupEnd();
info(...$args)
Alias of log().
log(...$args)
Displays the provided arguments in the Log panel of the btools console. HTML tags, string substitution, and styling are supported.
$string = “The answer”;
$int = 42;
$console->log($string, “to your question is”, $int);
Objects are displayed are expandable trees.
$user = [
“name” => “John”,
“email” => “[email protected]”,
];
$console->log($user);
Ctrl+click on any item displayed in the console to copy it to the clipboard.
You can easily display the message using different colors with the clog() method.
table($data, $columns = [])
This function takes one mandatory argument data, which must be an array or an object, and one additional optional parameter columns. It logs data as a table.
Each element in the array (or enumerable property if data is an object) will be a row in the table.
The first column in the table will be labeled index. If data is an array, the index values will be the array indices.
$console->table([“Elaine”, “Guybrush”, “LeChuck”]);
If data is an object, the index values will be the property names.
$console->table([
“firstName” => “Elaine”,
“lastName” => “Marley”,
“age” => 23,
“gender” => “female”
]);
If data is an array of objects, index will be the array index and a column will be created for each property.
$console->table([
[
“id” => “10003”,
“firstname” => “Guybrush”,
“lastname” => “Threepwood”,
“age” => 22,
“gender” => “male”
],
[
“id” => “10004”,
“firstname” => “Elaine”,
“lastname” => “Marley”,
“age” => 23,
“gender” => “female”
],
[
“id” => “10005”,
“firstname” => “Chuck”,
“lastname” => “Threepwood”,
“age” => 25,
“gender” => “male”
]
]);
$console->table([
[
“id” => “10003”,
“firstname” => “Guybrush”,
“lastname” => “Threepwood”,
“age” => 22,
“gender” => “male”
]
], [“firstname”, “lastname”]);
You can sort the table by a particular column by clicking on that column’s label.
time($label = 'default')
Starts a timer you can use to track how long an operation takes. You can give each timer a unique label.
When you call timeEnd() with the same label, the bcons console will output the time, in milliseconds, that elapsed since the timer was started.
$console->log(“Starting foo”);
$console->time(“Foo”);
sleep(2);
$console->timeEnd(“Foo”);
timeEnd($label = 'default', ...$args)
$console->log(“Starting foo”);
$console->time(“Foo”);
sleep(2);
$console->timeEnd(“Foo”, “Timer ended”);
timeLog($label = 'default', ...$args)
Logs the current value of a timer that was previously started by calling time().
Any additional arguments will be logged after the timer output.
$console->log(“Starting foo”);
$console->time(“Foo”);
sleep(1);
$console->timeLog(“Foo”, “after 1 second”);
sleep(1);
$console->timeEnd(“Foo”, “Completed”);
trace(...$args)
All messages displayed in the bcons console have their complete backtrace information available by clicking on the footsteps icon on the right, so this method is just an alias for log().
warn(...$args)
Works exactly like log(), but the messages are displayed in the Warnings panel.
$console->warn(“User generated message”);
$a = $b / 2;
Stack trace
All bcons messages have a stack trace icon that displays the file names and line numbers of the calls that generated the message.
Click on the footsteps icon on the upper right side of a message to display the stack trace.
function A()
{
B();
}
function B()
{
global $console;
$console->log(“Hello from B”);
}
A();
Filtering messages
All bcons messages have a filter icon that allows you to filter out messages based on the domain, requested URL, or source file name.
Click on the funnel icon on the upper right side of a message to display the filters menu, and select the filter you wish to apply. You can filter out messages from a whole domain, a specific URL, or a specific source file.
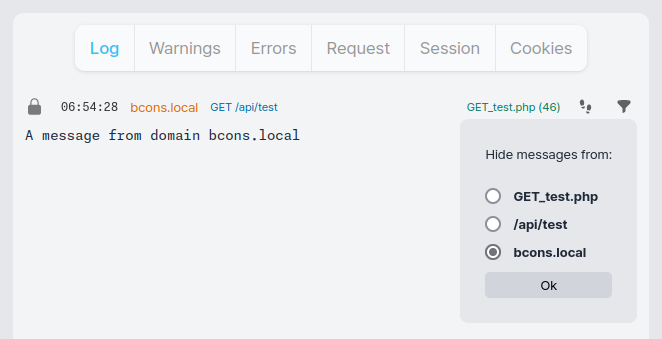
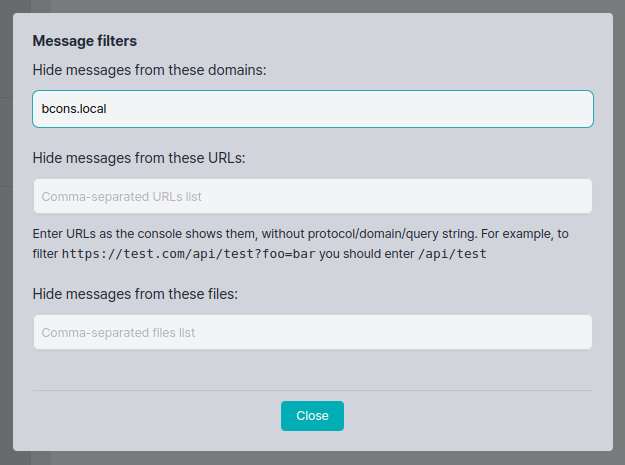
You can also set filters via the filters dialog. To open it, click on the big funnel icon near the console settings icon.

The filters dialog allows you to manually edit the filtered domains, URLs, and source files. Values are comma-separated.
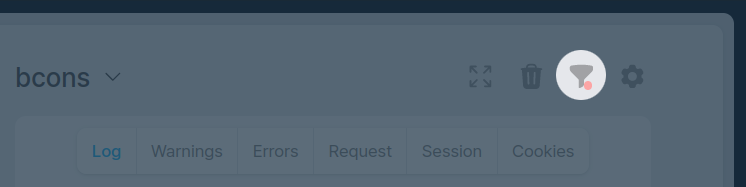
Whenever a filter is enabled, the top filter icon will show a red dot.
Below is a bcons console with some sample messages. Feel free to play around with the filters.